OAuth 2.0 是一个行业的标准授权协议。它的最终目的是为第三方应用颁发一个有时效性的令牌 token。使得第三方应用能够通过该令牌获取相关的资源。常见的场景就是:第三方登录。
登录流程大致如下:

Github 集成
Github的集成相对简单,而且限制较少。详细的文档在:
https://developer.github.com/apps/building-oauth-apps/authorizing-oauth-apps/
第一步: 创建 OAuth应用
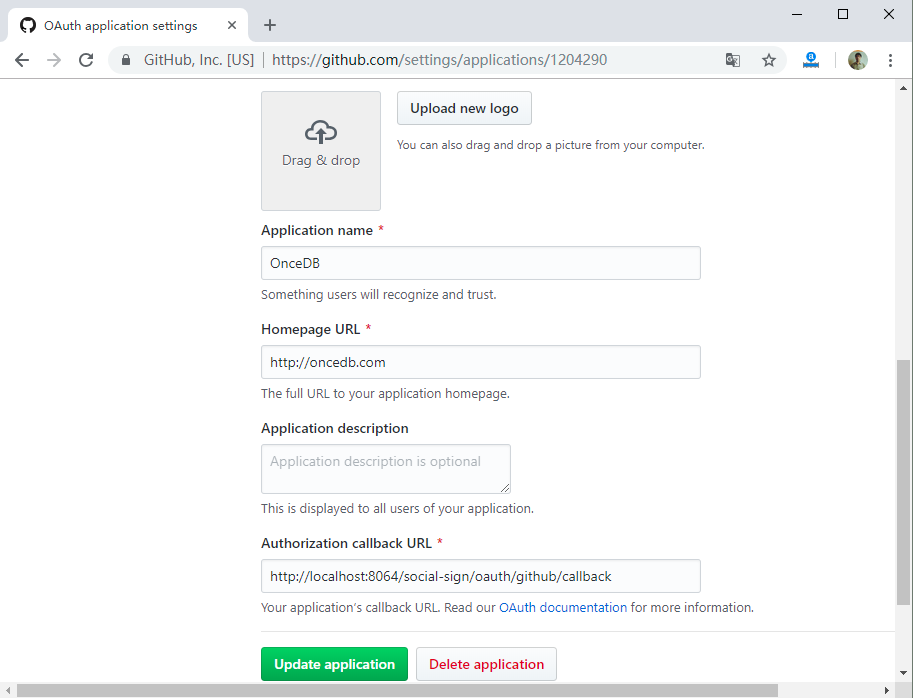
首先到登录github,到 Settings -> Developer settings -> OAuth Apps 创建一个新的 OAuth应用,如下图:

这里会生成 client_id, client_secret 两个参数,需要记下来,写到配置文件中。
这里还需要手动填写 redirect_uri 回调网址,即用户从您的网站跳到 Github.com 并登录返回的网址。
第二步:生成 github 登录网址
在您的网站上使用 client_id 和 redirect_uri ,生成第三方登录网址,如:
https://github.com/login/oauth/authorize?client_id=f283ce279713c1c9ac3c&redirect_uri=http://localhost:8064/social-sign/oauth/github/callback
用户点击这个地址,进入github登录。
第三步:github 重定向到网站
用户登录github后,github会重定向到你之前设置的 redirect_uri,并增加一个 code 参数,之后你就可以在后台获取用户信息。
1. Github登录后转向 redirect_uri
// 第一步:github回调,传递 code,用来交换 access_token
app.get('/social-sign/oauth/github/callback', function(req, res) {
  var code  = req.query.code
  if (!code) {
    res.send('no code')
    return
  }
  ...
}
2. 用code交换access_token
// 第二步:获取 access_token
OnceDoc.request({
  url: 'https://github.com/login/oauth/access_token'
, headers: {
      Accept: "application/json"
  }
, data: {
      client_id     : SOCIAL_SIGN.github.client_id
    , client_secret : SOCIAL_SIGN.github.client_secret
    , code          : code
  }
, type: 'qs'
}, function(err, response, data) {
..
3. 用access_token获取用户信息
// 第三步:获取用户信息,注册必须包含,User-Agent 建议是github用户名或者APP名
OnceDoc.request({
    url: 'https://api.github.com/user'
  , headers: {
      'User-Agent'    : 'OnceDB',
      'Authorization' : 'token ' + access_token
    }
}, function(err, response, data) {
...
调用成功后,返回的用户JSON数据示例:
{ login: 'newghost',
id: 88888888888888888,
node_id: 'SDFSXXXXXXDFSDFSDF',
avatar_url: 'https://avatars0.githubusercontent.com/u/1529044?v=4',
gravatar_id: '',
url: 'https://api.github.com/users/newghost',
html_url: 'https://github.com/newghost',
followers_url: 'https://api.github.com/users/newghost/followers',
following_url:
 'https://api.github.com/users/newghost/following{/other_user}',
gists_url: 'https://api.github.com/users/newghost/gists{/gist_id}',
starred_url:
 'https://api.github.com/users/newghost/starred{/owner}{/repo}',
subscriptions_url: 'https://api.github.com/users/newghost/subscriptions',
organizations_url: 'https://api.github.com/users/newghost/orgs',
repos_url: 'https://api.github.com/users/newghost/repos',
events_url: 'https://api.github.com/users/newghost/events{/privacy}',
received_events_url: 'https://api.github.com/users/newghost/received_events',
type: 'User',
site_admin: false,
name: 'Kris Zhang',
company: null,
blog: '',
location: 'Shanghai',
email: ' SDFSXXXXXXDFSDFSDF',
hireable: null,
bio: null,
public_repos: 20,
public_gists: 0,
followers: 74,
following: 3,
created_at: '2012-03-12T14:10:56Z',
updated_at: '2019-11-20T07:41:56Z' }
然后可以用这些信息自动注册或登录用户。
LinkedIn 集成
LinkedIn 最近对 OAuth 的请求接口进行了更新,限制了一些敏感信息的访问。截止目前,这篇文章使用还是旧的接口。
具体可参照这篇官方文章: https://developer.linkedin.com/zh-cn/docs/oauth2#
410 接口错误
不过进行到最后获取用户信息时,你可能会发现LinkedIn会返回410错误。
<error>
  <status>410</status>
  <timestamp>1579159582344</timestamp>
  <request-id>27XR33REUM</request-id>
  <error-code>0</error-code>
  <message>This resource is no longer available under v1 APIs</message>
</error>
接口更新
LinkedIn 的接口已经更新到 v2 版本,需要对之前的那篇官方文档进行一些修改:
将文中
access_token_url = 'https://api.linkedin.com/uas/oauth2/accessToken'
authorize_url = 'https://www.linkedin.com/uas/oauth2/authorization'
替换成
access_token_url = 'https://www.linkedin.com/oauth/v2/accessToken'
authorize_url = 'https://www.linkedin.com/oauth/v2/authorization'
将用户信息获取地址: https://api.linkedin.com/v1/people/~
替换成: https://api.linkedin.com/v2/me
用户信息示例
登录成功后,请求 https://api.linkedin.com/v2/me 会获取如下数据:
{ localizedLastName: 'Zhang',
  lastName:
   { localized: { en_US: 'Zhang' },
     preferredLocale: { country: 'US', language: 'en' } },
  firstName:
   { localized: { en_US: 'Kris' },
     preferredLocale: { country: 'US', language: 'en' } },
  profilePicture:
   { displayImage: 'urn:li:digitalmediaAsset:C4D03AQGxcGwMAF2UJA' },
  id: 'VbANm-OM_K',
  localizedFirstName: 'Kris' }
LinkedIn 隐藏了头像,邮箱,用户名等隐私信息,而且获取这些并不容易,这里并没有实现。
Social-Sign 模块源码
源码地址: https://github.com/OnceDoc/onceoa-modules/tree/master/social-sign
social-sign 模块安装方法:
- 在 oncedoc/config.js 中添加 SOCIAL_SIGN 配置
var SOCIAL_SIGN = {
    github: {
        client_id     : 'zzzzzzzzzzzzzzzzzzzzz1'
      , client_secret : 'xxxxxxxxxxxxxxxxxxxxxx1'
      , redirect_uri  : 'http://127.0.0.1:8064/social-sign/oauth/github/callback'
    },
    linkedin: {
        client_id     : 'xxxxxxxxxxxxxxxxxxxx2'
      , client_secret : 'yyyyyyyyyyyyyyyyyyyy2'
      , redirect_uri  : 'http://127.0.0.1:8064/social-sign/oauth/linkedin/callback'
    }
}

/*
导出引用
*/
typeof module !== 'undefined' && (module.exports = {
    ...
  , SOCIAL_SIGN         : SOCIAL_SIGN
});
- 将 social-sign 复制到 oncedoc/mod 目录下
- 进入 OnceOA 桌面, /onceos -> 应用管理中启用 social-sign
- 重启 OnceOA 进程

